2.3.1 Collaborative writing using Wiki
| Сайт: | WMO Education and Training Programme |
| Курс: | Calmet Moodle Unit 2 - Provide learning resources |
| Книга: | 2.3.1 Collaborative writing using Wiki |
| Напечатано:: | Гость |
| Дата: | среда, 31 декабря 2025, 05:26 |
Описание
....
1. Introduction
A Wiki is a collaboratively created and edited document. You can add a Wiki to your Moodle course to, for example do a group project or write a combined essay.
Basically, a wiki page is a web page everyone in your class can create together, right in the browser. A wiki starts with one front page. Each author can add other pages to the wiki by simply creating a link to a page that doesn't exist yet.
2. Example
A wiki is a collection of collaboratively authored web documents. Basically, a wiki page is a web page everyone in your class can create together, right in the browser, without needing to know HTML. A wiki starts with one front page. Each author can add other pages to the wiki by simply creating a link to a page that doesn't exist yet.
3. Instruction
Creating a Wiki
- On your course page, click Turn editing on (top right). Editing icons and links will appear.
- Click + Add an activity or resource. The Activity chooser will open.
- In the Activity chooser, select Wiki. A description will be displayed at right.
- Click Add. The Adding a new Wiki page will open.
- On the Adding a new Wiki page, in the Wiki name field, enter a name for the wiki (required).
- In the Description field, provide instructions or background information for your students (required).
- In the General area, configure the following settings:
- Click the Format heading to expand it. Configure the following settings:
- Default format:
Choose the markup format for how text is formatted when editing a page. HTML Format is recommended. - Force format:
Controls whether the markup format will be used for all pages of the wiki (Recommended).
- Default format:
- To assign the wiki activity to a group of students within your class, click the Common module settings heading to expand it and configure the settings.
Note: You must first create the groups. - Click Save and return to course.
3.1. Adding your first page
Once the Wiki is set up you need to create the first page.
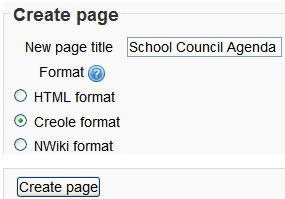
Back in your course page click the link for your new Wiki and you will see the following screen:
Choose the Wiki Format. By default the format is set to HTML, which will use the Rich Text Editor for all content creation. If you are familiar with wiki mark-up, you can set the format to Creole or Nwiki to create a more Wikipedia look and feel. The Wiki activity allows contributors to select the format for each page they enter by default. If you would like to specify a format for the entire wiki, select the format and check the Force Format box.
3.2. Adding more pages
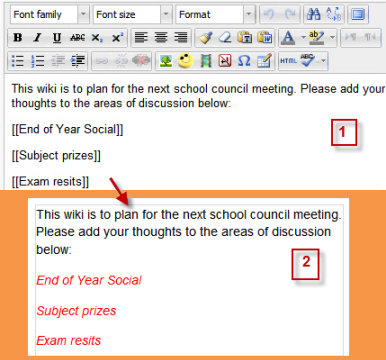
- Type the name of your page inside double brackets. (1 in screenshot below) You can preview it by clicking the "preview" button towards the bottom of the screen.
- Press the "save" button.
- Now click the (red) link for one of the pages (2 in screenshot below) and you will be prompted to create it in the same way you create the first page:
- A page once created has a blue link.
Hint:
If you use theNew option from the navigation block you will still need to copy and paste the name of the new page onto the immediate parent page and surround it with double brackets. This creates a link to your new page and makes it accessible from the main Wiki page. Otherwise nobody will recognise the so called lost new page.
Wiki editing in general
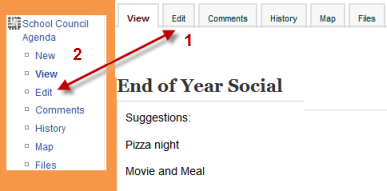
Depending on the type of the wiki, there are several ways to edit your page. But don't worry: The best thing of a wiki is, that nothing is lost. The old version will be there - and if someone changes your version of the page - your version will also be there. Note that the options for editing, commenting viewing history, map and files may all be accessed both from tabs at the top (1 in screenshot below) and links in the navigation block (2in screenshot below):
View
- The View tab at the top or link in the navigation block allows users to display and view the wiki page.
Edit
The Edit tab at the top or link in the navigation block allows users to edit the wiki page.
Comments
- The Comments tab at the top or link in the navigation block allows users to see and add comments about the wiki.
History
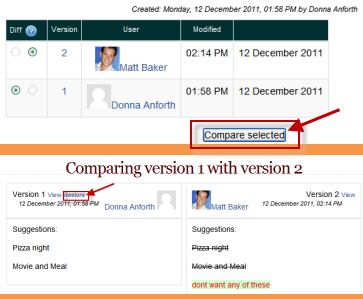
- The History tab at the top or link in the navigation block allows users to see what has been altered in the wiki.
- Compare edits by clicking the "Compare Selected" button.
- Click the "Restore" button of the version you wish to restore if the latest edit is unsuitable:
Map
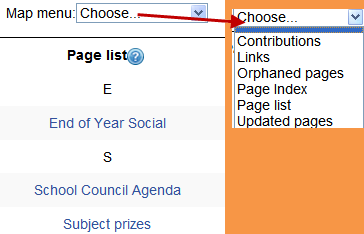
- The Map tab at the top or link in the navigation block allows users to view areas of the wiki such as a list of pages (as in the following screenshot), updated or orphaned pages etc. (Orphaned pages are pages not linked to anywhere.)
- To select what you want to see, click the Map menu dropdown box.
Files
- The Files tab at the top or link in the navigation block allows users to access any files which have been added to the wiki.
- By default, the Teacher role can add and manage files to the Files tab, but the Student role can only view them. You could change this though with a permissions override to the Manage wiki files capability (mod/wiki:managefiles) in any particular wiki.
Administration
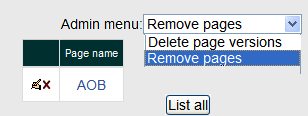
- The Administration tab at the top or link in the navigation block is available to editing teachers in the course so they can delete page versions or selected pages. Clicking the "list all" button will list available pages to delete. The first page of the wiki cannot be deleted.
Deleting pages
Teachers and other users with the mod/wiki:managewiki capability can delete any page or page version, with the exception of the first page, via the Administration link in the navigation block or the Adminstration tab. See the section Administration above.
Markup language
You miss all the formatting you know from other moodle activities? That's because the wiki-type of your wiki is e.g. nwiki. See Nwiki markup
4. Practice
Now go to your practice site and:
- Create a new Wiki
- Add a first page
- And write a short paragraph (you could write something about satellite meteorology!) and save it.
- Use the the Edit tab to add a second paragraph.
