1.1.3 Using blocks to aid navigation
| الموقع: | WMO Education and Training Programme |
| المقرر: | Calmet Moodle Unit 1 - Design an effective learning environment |
| كتاب: | 1.1.3 Using blocks to aid navigation |
| طبع بواسطة: | مستخدم ضيف |
| التاريخ: | الأربعاء، 17 يونيو 2026، 5:51 AM |
الوصف
.
1. Introduction
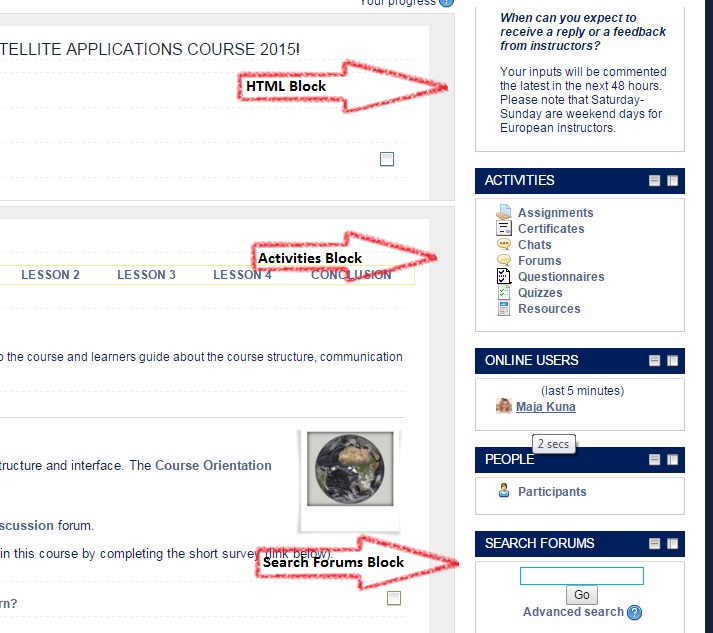
The Moodle course home page interface may differ depending on the Theme applied, that may be customized for your institution. Nevertheless, the basic elements of the home page are usually the same. One of the core elements of the home page are Blocks, which appear on the right or left side column of the Moodle course home page and other pages. Blocks are flexible because:
- Course Creator, Teacher, or anybody with permission to edit the course page, can Add and Delete Blocks.
- There are many types of Blocks, like for example Navigation, Calendar, Comments or Latest News blocks.
- Different Blocks can appear on all course pages or only on single and selected pages.
- Blocks can be placed on the side of the screen (if your theme supports it) via the Dock icons (
 and
and  ).
).
You can find further information on Blocks not mentioned in this lesson as follows:
- Comments and Messages blocks - Unit 3
- Administration block - Unit 1, Lesson 1.1.1
- Upcoming events and Calendar blocks - Unit 1, Lesson 1.1.6
- Latest news - Unit 1, Lesson 1.2.1
- Quiz results and Course Completion - Unit 1, Lesson 1.2.2
If you do not see the Block you would like to use listed here, check Moodle Docs for detailed instructions: https://docs.moodle.org/27/en/Blocks
2. Example
Navigate through sub-chapters to see different examples of Blocks.
2.1. Navigation
The Navigation block is a dedicated block that aids navigation. This block has links which can be expanded or collapsed.When logged in, a regular user will see as default: My home, Site pages, My profile and My courses.
On the course home page the Navigation block shows also the Current course. When a user is in a course, these link expands to show each section of the current course and any activities and resources which are in that section.
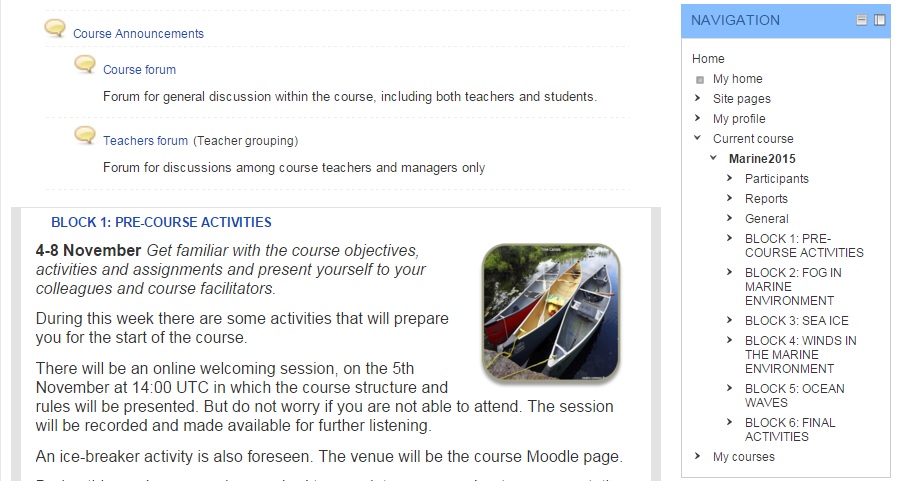
The links in the Current Course menu inside the Navigation block are added automatically and they are based on the names of the Sections in your course. To make the Current Course navigation menu readable and usable to the learners, remember to keep the section names short and meaningful. In case you use a Weekly format for the course structure, the navigation menu becomes a navigable schedule.
For instructions on how to configure the Navigation block, check the dedicated sub-chapter of this lesson.
For understanding how to change the course format to Weekly, check the Lesson 1.1.2 of this unit.
For more ideas on how to create a course schedule, check the Lesson 1.1.6
2.2. HTML
Unlike most of the Blocks that can be added only once within a course environment, the HTML block can be added multiple times. The HTML block is very flexible in terms of providing standard Moodle Text Editor to add text, that can be formatted for instance by using tables, lists, highlight, various fonts, hyperlinks, images and videos. This rich functionality leaves a lot of space for a course designer creativity. However it is advisable to think first what is the purpose of the block, to choose and display relevant content.
For example in the interface of this course, you can find the HTML block being used to create a quick iconic navigation between units.
![]()
A similar use of the HTML has been done in another course, where text was hyperlinked to a specific section.
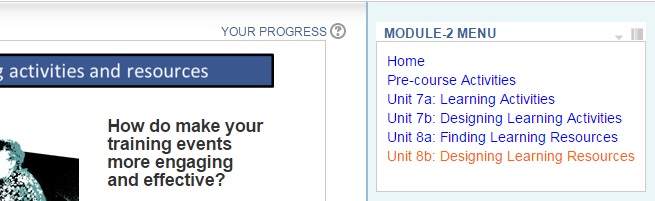
In the above example, you may have noticed that formatting of the last string of text is different. It has been done to indicate the current topic. Find out how to create a customized navigation using the HTML block in the Instructions chapter of this lesson.
In case you decide not to use customized navigation, you may like to use the default Navigation block, which links to each section and updates the text automatically. Nevertheless keep in mind that the configuration of the Navigation block is limited, as mentioned in the previous chapter of this lesson.
2.3. Activities
Activities, like for example Forum or Quiz, and Resources, like for example Page and Book, are two categories of Moodle items that can be added to the course. You can learn more about different Resources in the Unit 2 or check these links:
Once you have some Activities or Resources in your course you may add the Activities block to help participants navigate through them. The Activities block lists not only all the Activities, subdivided by the activity type, but also Resources, all types under this category. This Block can serve as a quickly accessible launchpad for learners to access Quizzes, Forums, Assignments and other Activities and Resources present in the course.
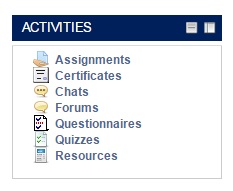
Once a learner clicks for example on the Forums link, the table with all Forums' Name, Description and Subscription status will appear.
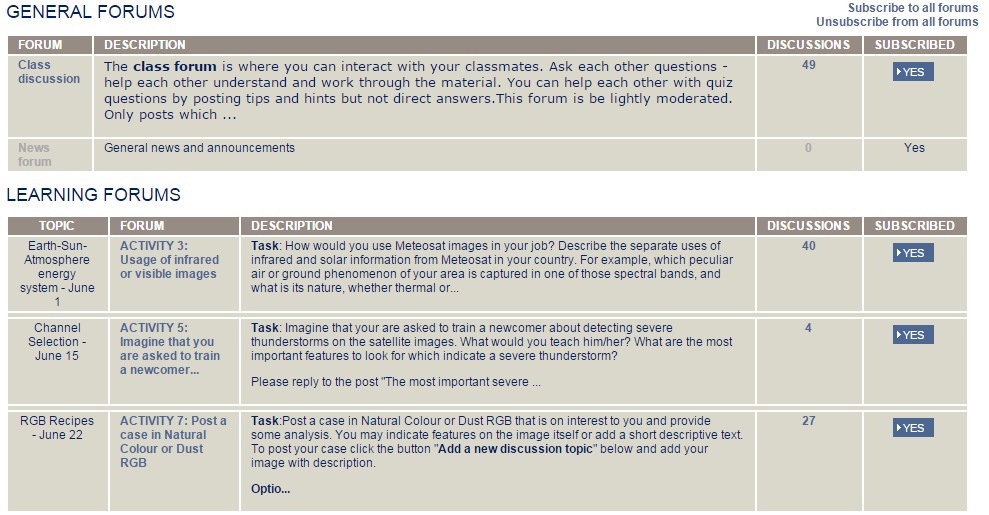
You will see in the settings of Activities and Resources a required Description field. It is important to insert a meaningful but short text describing the item to learners, as this text can be displayed in multiple places, for example in the summary page launched from the Activities block.
2.4. Search forums
Forums are often the main communication tool in the courses. Finding information shared in the forum may become challenging if there are multiple Forums included in the course. The Search Forums block allows you to search the course forums for a word or phrase. Type the word or phrase you want to find in the text field space.

Basic searching
For basic searching of one or more words anywhere in the texts, just type them separated by spaces. All words longer than two characters are used.
Advance searching
If you want to use advanced search options you can either move to the Advanced search page (clicking Advanced Search in the Search Forums block). To search for
- an exactly matching word, use the plus sign, and the minus sign if there are particular exact words you don't want included in the search.
- a particular phrase, use double quotes around it.
- texts by a particular user, prefix a word from their name with "user:". If you know the user id of a particular user, you can search for them like this.
- a word within the subject or title of a text only, prefix the word with "subject:".
You can also use the Advanced forum search options.
To use the advanced search options press the Advanced search button or the search button without typing anything in the Search field. You will see a complete form that makes it easier to do advanced searches.
- These words can appear anywhere in the post works in the same way as the Search field: one or more words you type in here will be found in all the places in the post they appear.
- This exact phrase must appear in the post searches for an exact phrase in the post.
- You should use These words should NOT be included if there are any particular words you don't want included in the search.
- Posts must be newer / older than this narrows down the number of posts searching according to time limits.
- Choose which forums to search allows searching only in one forum.
- These words should be in the subject narrows down the number of posts found to those containing a given word/phrase in the forum subject.
- This name should match the author allows searching for the posts by one author.
2.5. Courses
Participants may be enrolled in more than one course at the same time. To help them to navigate to another courses, add a Courses block to the course home page
The Courses block lists and allows navigation between all of the courses in which the logged in user is enrolled. The block title shows as My courses and allows one-click access to a course's home page.

There is a also the option to list All courses... available within the Moodle site. This will display a list of course types and a click on one of the types will reveal all the courses in that category. There is also a search all courses option on this page.
A brand new user to a Moodle site, who has not enrolled in any course, will see the block title as "Course Categories".
When a student enters an unassigned course using the course block, they will be asked to enroll.
Note that the Navigation block also includes a list of all courses a user is enrolled in.
Hide All courses link
Administrator can hide the "All courses" link at the bottom of the block from everyone except administrators.This can be done in Settings > Site administration > Plugins > Blocks > Course list, and changing the block_course_list_hideallcourseslink setting.
3. Instruction
For specific instructions refer to the sub-chapters.
3.1. Add / Delete a Block
To Add a block
- Turn editing on and then from the Add a block drop-down menu select the block you want to add.
- Note that you can add different blocks on the Resource or Activity page. You need to be in the edit mode to see the Add a block drop down menu.
To Delete a block
- Turn editing on and go to the block you want to delete and, depending on your theme and Moodle version, either expand its settings and click a Delete link or click the Delete button.
- Confirm the action by replying to the message that appears.
3.2. Configure a Block
Blocks are flexible and you can decide:
- where they will be located,
- if they appear on all course pages the same way,
- if they can be collapsed by individual users.
Selecting the position and/or appearance can be done in the Configure option in the Block settings. You can access it only in the Edit mode.
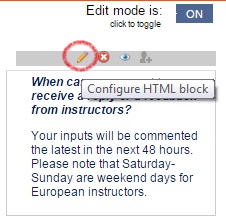
Note that the Configure icon may vary depending on the Moodle theme used. It is often a pen or a gear.
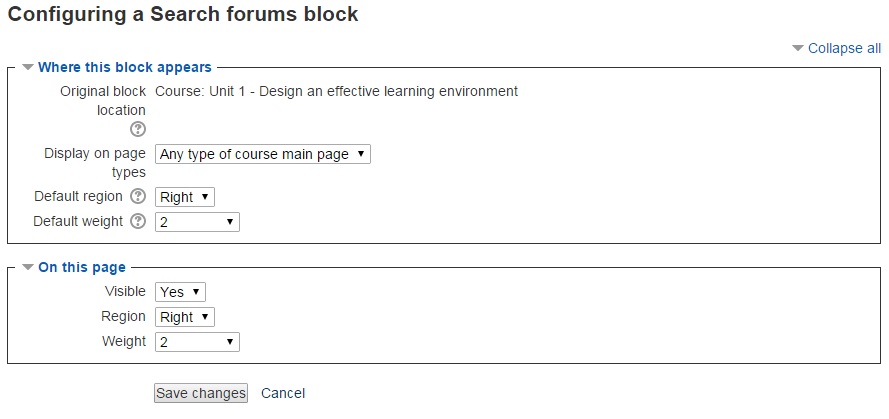
Once you are in the Edit mode and in the Configure page you will be able to
- choose the default location (left or right) of the Block (Where this block appears > Default region) and on the page you are currently editing (On this page section > Region)
- make the Block appear only on the home page, in the Where this block appears section >
3.3. Configure Navigation block
Site Administrators can configure the site level Navigation Block. Teacher and Student roles have limited options to configure the position of the Navigation Block on their My Moodle page.
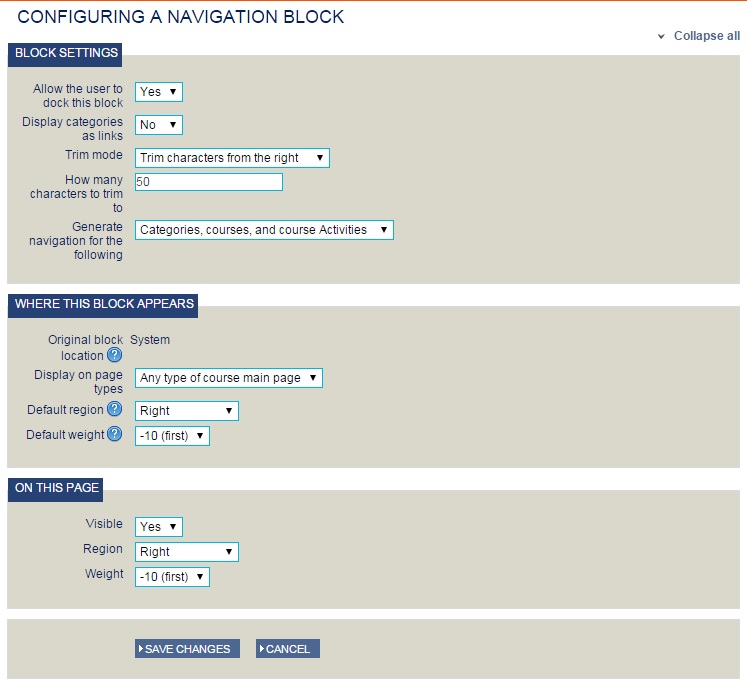
With the editing on, select the edit icon in the Navigation Block. Then configure the following settings:
Allow users to dock this block
This allows users to free up screen area if they need to, displaying a link to the Navigation Block in a tab at the side.
Display categories as links
As long as Display Categories is enabled in Site Administration > Appearance > Navigation (which it is by default), this setting can be enabled.
Where Categories display as links, clicking on those links opens the category page, whereas clicking on the small arrowhead pulls down a further menu of its courses. It may be helpful to inform users of this distinction.
Trimming
Long titles wrap over several lines, and this can affect the readability of a menu.
Enabling trimming removes characters which exceed an optional limit for each menu item. There is an option to remove characters from the beginning, middle, or end of the title.
The options in this setting allow you to configure how far the menu should expand.
- Everything - the menu expands to allow access to any page in any of your course areas.
- Categories and courses - the menu expands as far as listing links to the course areas in each category.
- Categories, courses and course structures - the menu expands as far as listing the section titles in each course area (these display unlinked).
- Categories, courses and course activities - the menu expands to allow access to any page in any of your course areas
Note that if you do not have rights to change this setting, you may ask your administrator to assign them to you or help you to configure the navigation in your course.
3.4. Create a customized navigation using the HTML block
As you saw in the "Example" sub-chapter of this lesson there are multiple ways to use the HTML block to aid navigation. The two ideas presented in this lesson are
- add a list of text which is linked to specific sections or resources
- small images that are also linked to specific sections or resources
Let's see together how to create this customized navigation.
Linked text
You need to do the following two steps to create customized navigation with an HTML block.
- Add an HTML block.
- Copy URLs of the sections and resources that you want the menu to navigate to.
- Insert text and link it to sections or resources.

- To add an HTML block you have to Turn editing on and from the Add A Block drop down menu select HTML
- Go to the page, resource or section that you want the menu to navigate to. Copy the URLs from the browser window by using the CTRL + C or Right mouse click + Copy. Paste URLs temporarily to a document. You may use a Notepad or other aid to keep the copied links.
- In the Configuring an HTML block page that appears, and in the Content section you will see the common Moodle text editor.You will be able to type in the text you want to link.
- Type in the text you want to hyperlink and select it.
- Then from the editor toolbar click the Insert / edit link button
![]()
-
- Insert one of the URLs you temporarily stored in a document.
- Repeat these three steps for other text you want to link.
Linked images
There are multiple steps you will have to go through consisting of:
- Using external image editor to create images.
- Add an HTML block.
- Create a table inside the HTML block.
- Insert images to the table and resize them.
- Link images.
![]()
- You may choose various tools to prepare small images that will serve as navigation icons or buttons, such as MS PowerPoint, or Inkscape or GIMP, which are a free tools.
- To add an HTML block you have to Turn editing on and from the Add A Block drop down menu select HTML
- In the Configuring an HTML block page that appears, and in the Content section you will see the common Moodle text editor.You will be able to create a table that will help to align the images.
- In the text editor click the Insert /edit table button.
![]()
-
- To recreate the navigation from the example, you will have to create a table with three columns and two rows. Make sure that the border is set to "0", so it will be invisible.
- Once the table is added click inside the first cell and then in the text editor click Insert / edit image button.
![]()
-
- Upload the first image to be used as a button and resize it if necessary using the Appearance tab and Dimension option in the Insert /edit image wizard. Note that you can use pixels (e.g. 50 px) or percentage (50%) to indicate the image dimension. Tick the
- After the image appears in the table, select it with the mouse and then in the text editor click the Insert / edit link button.
![]()
-
- Insert the URL of the page or resource you would like this button to be linked to.
- Repeat the last three steps for other buttons.
Hint - How to find link to the summary page of all Activities or Resources of a certain type?
Moodle automatically creates summary pages listing all the Resources or Activities of certain type. The "Example" sub-chapter presented the Forums summary page. When you add an Activity block, the links to the summary pages are easily accessible. However, you may also figure out the URLs of the summary pages without adding the block.
If your course has the URL
http://yourcourse.com/moodle/course/view.php?id=66
the link to the Resources summary will be
https://etrp.wmo.int/course/resources.php?id=66
...to the Quizzes summary page will be...
http://yourcourse.com/moodle/mod/quiz/index.php?id=66
...the link to Forums summary...
http://yourcourse.com/moodle/mod/forum/index.php?id=66
4. Practice
Add a Forums Search block
The "Instruction" sub-chapter explained the procedure of adding any block. Please refer to that sub-chapter, follow the instructions and select Forums Search block from the Add block drop down menu. Try to change the position of the block and place it on the top, or in a different column (right/left).
Create a customized navigation using icons
The "Instruction" sub-chapter explains how to create a customized navigation. Please refer to that sub-chapter, follow the instructions and create an iconic menu using an HTML block. You may choose the buttons to link to for example specific resources, specific activities such as Forums or Quizzes summary page or a course section.